Imagine a dessert that’s effortlessly simple, incredibly delicious, and surprisingly wholesome. A treat that satisfies your deepest sweet cravings without an ounce of guilt. Welcome to the enchanting world of Peanut Butter Banana Nice Cream, a culinary marvel that truly lives up to its name. This isn't just a dessert; it's a testament to the magic that happens when humble, ripe bananas meet the irresistible allure of peanut butter.
Often lauded as a "one-ingredient wonder," the foundation of nice cream is typically just frozen bananas, blended into a creamy, soft-serve consistency. Add a spoonful of rich peanut butter, and you elevate it to an entirely new dimension of flavor. What makes this recipe so beloved isn't just its simplicity, but its ability to deliver all the indulgent creaminess of traditional ice cream, entirely dairy-free and packed with natural goodness. It's a game-changer for anyone seeking a healthy, satisfying treat, and with a few simple tweaks, you can even transform it into delightful peanut butter banana ice pops!
The Sweet Secret: What is Nice Cream?
At its heart, "nice cream" is a brilliant, health-conscious alternative to conventional ice cream. The term itself is a playful nod to its "nice" ingredients and its uncanny resemblance to soft-serve. The primary ingredient? Just one: ripe, frozen bananas. When blended, these humble fruits undergo a magical transformation, morphing into a silky-smooth, naturally sweet, and incredibly creamy dessert. It's truly a testament to nature's confectionery genius!
Why do bananas work so well? It's all about their unique composition. Ripe bananas are rich in pectin, a soluble fiber that acts as a natural thickener. When frozen and then blitzed in a high-speed blender, the ice crystals are broken down, and the pectin creates an emulsified, creamy texture that mimics traditional ice cream without any dairy, added sugar, or artificial ingredients. Furthermore, bananas are a powerhouse of nutrients, offering a good source of potassium, vitamin B6, vitamin C, and dietary fiber. This means you're not just enjoying a treat; you're nourishing your body with every spoonful.
The beauty of nice cream lies in its versatility. While the basic banana version is fantastic on its own, it serves as the perfect canvas for countless flavor combinations. Adding a spoonful of peanut butter isn't just a popular choice; it’s an iconic pairing that creates a nostalgic, comforting, and utterly delicious experience, marrying the sweetness of banana with the savory richness of nuts.
Crafting Your Perfect Peanut Butter Banana Nice Cream: The Essentials
Making this incredible dessert is surprisingly straightforward, but a few key steps and insights can elevate your nice cream from good to absolutely phenomenal.
The Star Ingredient: Ripe Bananas
The success of your nice cream hinges almost entirely on the quality and preparation of your bananas. Don't underestimate this foundational step!
- Ripeness is Key: This is non-negotiable. Choose bananas that are very ripe – yellow with plenty of brown spots, but not completely mushy. Overly ripe bananas are naturally sweeter and have a softer texture when frozen, which makes for a smoother, creamier blend. Underripe bananas will result in a less sweet, more icy, and less satisfying nice cream.
- Preparation for Freezing:
- Peel: Always peel your bananas before freezing. Attempting to peel a rock-solid frozen banana is a frustrating endeavor no one needs.
- Slice: Cut the peeled bananas into uniform chunks, about 1-inch thick coins. This helps them freeze evenly and makes them much easier for your blender to process. Larger chunks can put a strain on your blender and may result in an inconsistent texture.
- Single Layer Freeze: Spread the banana chunks in a single layer on a parchment paper-lined baking sheet or plate. This prevents them from clumping together into one solid block, allowing for easier blending later. Once frozen solid (usually 2-3 hours), you can transfer them to a freezer-safe bag or container for longer storage (up to 2-3 weeks).
The Flavor Boost: Peanut Butter
While the bananas are the "one ingredient," adding peanut butter transforms it into the magical treat you're here for. It's technically optional if you're a purist, but for a truly satisfying experience, it's highly recommended.
- Type Matters: We recommend a smooth, natural peanut butter that contains only peanuts (and maybe a touch of salt). These types often have a runny consistency after stirring and blend beautifully, contributing to the overall creaminess. If using an oil-separated natural peanut butter, give it a good stir before measuring to ensure even distribution of flavor and texture. Crunchy peanut butter can also work, adding a delightful textural contrast, but might result in a slightly less smooth base.
- Flavor Pairing Perfection: The rich, nutty, and slightly savory notes of peanut butter perfectly complement the natural sweetness of the banana. It creates a classic flavor combination that's incredibly comforting and universally loved. For an extra layer of decadence, consider a touch of vanilla extract or a pinch of cinnamon to enhance the flavors.
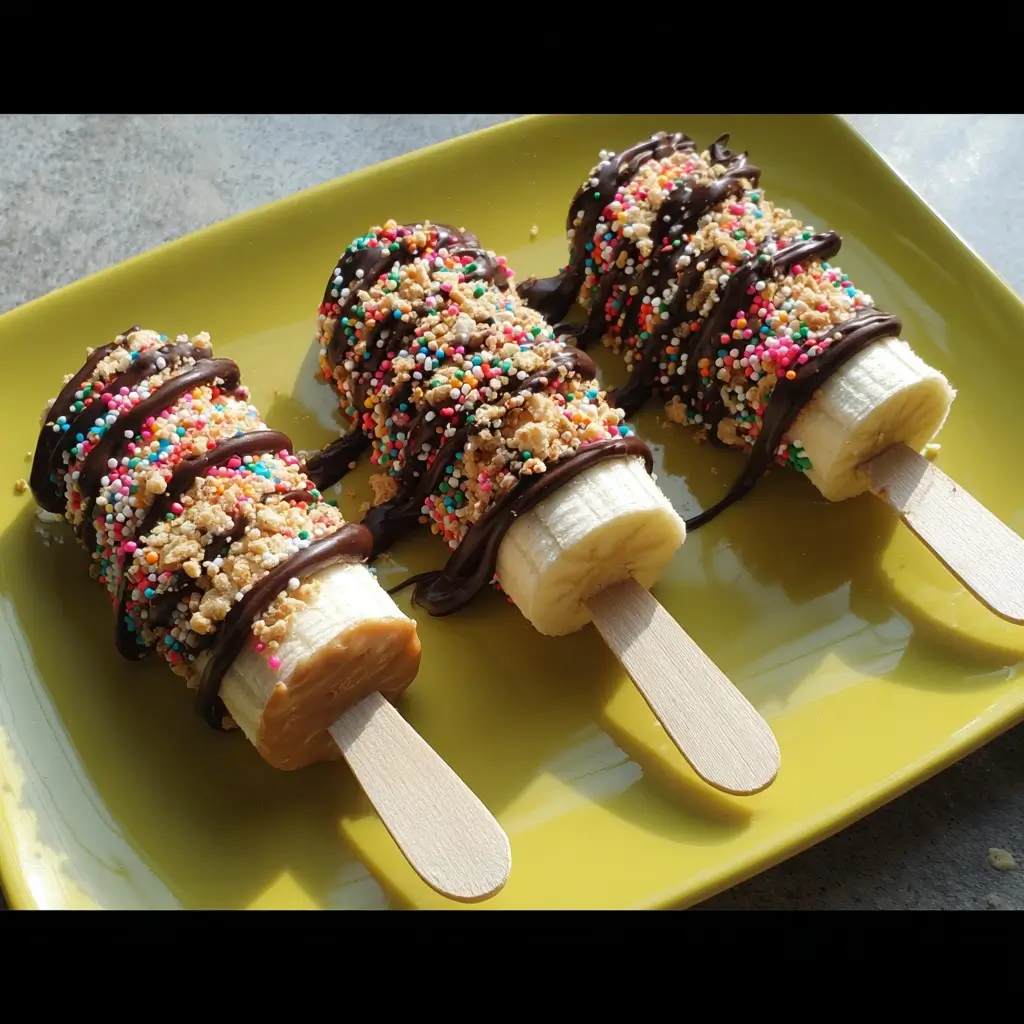
Beyond the Blender: Turning Nice Cream into Peanut Butter Banana Ice Pops
The versatility of this banana-peanut butter base extends far beyond a simple bowl of soft-serve. With just a slight adjustment, you can transform your creamy nice cream into delightful, grab-and-go peanut butter banana ice pops. These make for a perfect, mess-free treat, especially on a hot day or for portion-controlled snacking.
The key difference when making peanut butter banana ice pops is adjusting the consistency. For a thick nice cream, you use minimal liquid (or none at all) during blending. For popsicles, you need a pourable mixture that will easily fill your molds. This usually means adding a splash of plant-based milk (like almond milk, soy milk, or oat milk) to the blender along with your frozen bananas and peanut butter.
To make Peanut Butter Banana Ice Pops:
- Combine your frozen banana chunks and peanut butter in a high-speed blender.
- Add a small amount of plant-based milk, starting with about ¼ to ½ cup per 2 medium bananas. You want enough liquid to get the blades moving and create a smooth, pourable "smoothie" consistency, but not so much that it becomes watery.
- Blend until completely smooth, scraping down the sides as needed.
- Pour the mixture into your favorite popsicle molds. If desired, you can add small pieces of chocolate chips or chopped nuts to the molds before freezing.
- Insert popsicle sticks and freeze for at least 3-4 hours, or until completely firm.
- To unmold, briefly run the molds under warm water for a few seconds. Store your homemade peanut butter banana ice pops in an airtight container in the freezer for up to two weeks.
This simple adaptation means you can enjoy the same incredible flavor and health benefits in a fun, handheld format, perfect for kids and adults alike.
Tips for Nice Cream Success and Creative Variations
Mastering nice cream is simple, but a few expert tips can ensure a perfect batch every time. Moreover, don't be afraid to experiment and personalize your creation!
Blending for Perfection:
- Use a High-Speed Blender: While a regular blender can work, a high-speed blender (like a Vitamix or Blendtec) will yield the smoothest, creamiest result with less effort.
- Patience is Key: Start with just the frozen bananas and peanut butter. Begin blending on a low setting, then gradually increase speed. Use the tamper (if your blender has one) to push the frozen chunks down into the blades. Scrape down the sides of the blender frequently.
- Add Liquid Sparingly (if at all): For a thick, scoopable nice cream, avoid adding any liquid if possible. If your blender is struggling, add liquid one tablespoon at a time (plant-based milk or even a splash of water) until it just barely blends. The less liquid, the thicker and creamier your nice cream will be. For easy dairy-free peanut butter banana frozen treats for cravings that are pourable for molds, add a bit more liquid as described above.
Creative Variations to Explore:
Once you’ve mastered the basic peanut butter banana nice cream, the possibilities for customization are endless:
- Chocolate Lover's Dream: Add a tablespoon of unsweetened cocoa powder or cacao powder to the blend for a rich chocolate-peanut butter nice cream. Swirl in some mini chocolate chips at the end.
- Fruity Fusion: Blend in other frozen fruits like berries, mango chunks, or pineapple for a vibrant, multi-layered flavor profile.
- Spice it Up: A pinch of cinnamon, nutmeg, or even a tiny dash of cayenne pepper (for a kick!) can add warmth and complexity.
- Protein Boost: For a post-workout snack, add a scoop of your favorite vanilla or chocolate protein powder to the blender.
- Textural Delights: Stir in granola, chopped nuts, toasted coconut flakes, or a drizzle of maple syrup or agave after blending for added texture and sweetness.
Remember, the beauty of nice cream is its adaptability. Feel free to experiment with what you have on hand and discover your own favorite combinations!
The journey from simple ripe bananas to a decadent bowl of Peanut Butter Banana Nice Cream is nothing short of magical. It’s a testament to the power of whole foods and mindful eating, proving that healthy choices can be utterly indulgent. Whether you enjoy it as a refreshing soft-serve, packed with nutrients and natural sweetness, or transform it into delightful peanut butter banana ice pops for a convenient grab-and-go snack, this recipe promises pure, frozen bliss. So grab those ripe bananas, a spoonful of your favorite peanut butter, and prepare to discover your new favorite healthy treat!
